REVIEW · GHENT
Historical Walking Tour: Legends of Gent
Book on Viator →Operated by Gent Free Walking Tour · Bookable on Viator
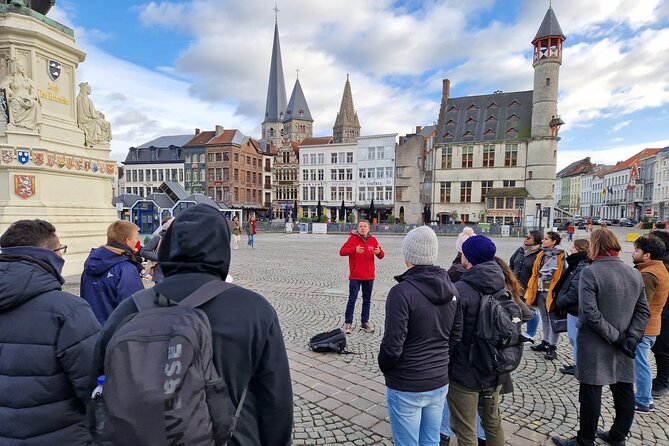
Ghent tells its story fast. Legends of Gent is a 2-hour walk through the medieval center, led in English, with stops at the places that shaped trade, faith, and power. You also get practical food and drink tips along the way, not just facts on stones.
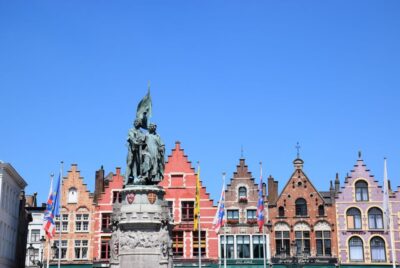
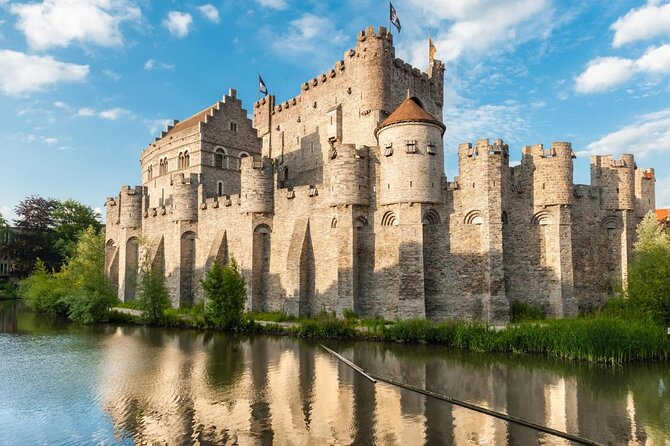
What I really like is the mix of big-name landmarks and street-level details. You’ll stand near St. Bavo’s Cathedral for the world-famous Ghent Altarpiece by the Van Eyck brothers, then move on to Gravensteen Castle, a rare medieval castle that sits right inside the city and is still very well preserved.
One thing to consider: you’re on your feet for about 2 hours, and a few stops note admission tickets not included if you want to go inside (Design Museum Gent, Gravensteen, Ghent Town Hall, and the Belfry). Plan for a bit of walking and decide in the moment if entrances are worth it to you.
In This Review
- Key things that make Legends of Gent a smart way to see Ghent
- Why this 2-hour walking tour fits first-time Ghent perfectly
- Price and value: $3.62 up front, pay-what-you-want at the end
- Getting Oriented: meeting near Hostel Uppelink and ending at the Belfry
- Stops 1–5: trading canals, a design-minded detour, and Gravensteen up close
- Stop 1: St Michael’s Bridge (about 15 minutes)
- Stop 2: Graslei and Korenlei (about 10 minutes)
- Stop 3: Design Museum Gent (about 10 minutes)
- Stop 4: Het Groot Vleeshuis (about 10 minutes)
- Stop 5: Gravensteen (about 10 minutes)
- Stops 6–13: squares with nicknames, churches, and a Van Eyck payoff
- Stop 6: St. Veerleplein (about 10 minutes)
- Stop 7: Huis van Alijn (about 10 minutes)
- Stop 8: Vrijdagmarkt (about 10 minutes)
- Stop 9: Werregarenstraat (about 10 minutes)
- Stop 10: Ghent Town Hall (Stadhuis) (about 10 minutes)
- Stop 11: St. Bavo’s Cathedral (about 10 minutes)
- Stop 12: Het Belfort van Gent (about 10 minutes)
- Stop 13: Esglesia de Sant Nicolau (about 10 minutes)
- How the guide makes the walk better than a highlight list
- Practical tips so you enjoy the 2 hours (instead of chasing them)
- Who should book Legends of Gent
- Should you book this tour?
- FAQ
- How long is Legends of Gent?
- Is the tour offered in English?
- Where do I meet and where does the tour end?
- What is the group size limit?
- Is the ticket mobile?
- Does the tour use a pay-what-you-want format at the end?
- Are admission tickets included for every stop?
- Does the tour run in bad weather?
- What is the cancellation policy for a full refund?
Key things that make Legends of Gent a smart way to see Ghent
- Pay what you think it’s worth at the end keeps the experience feel personal, especially if your guide is doing a great job.
- Iconic Ghent landmarks in one loop: St. Bavo’s Cathedral, Gravensteen, the Belfry, and key squares.
- Trading-hub route: you’ll connect canal-side spots like Graslei and Korenlei to how Ghent grew.
- Storytelling that explains names like the square of death and life and the people’s tower.
- Local recommendations for eating and exploring so you leave with a plan, not just photos.
- Small enough to hear the guide (max 35), and in practice the commentary is clear even on bigger departures.
Why this 2-hour walking tour fits first-time Ghent perfectly
If you only have a day or two in Ghent, this kind of route works because it gives you a mental map. You start with the skyline view and the medieval trading spine, then you walk through the city’s “who held power and why” moments. By the time you reach the churches and the big public buildings, the city starts to make sense.
Another strong point is the guide style. In the English-led tours, names like Tatiana, Kasia, Kenny, Robin, Florian, and Sophia show up again and again for good reason: people praise the combination of humor, clear storytelling, and practical tips. That matters. Ghent is the kind of city where details reward you, and a good guide helps you spot what you’d otherwise miss.
The format is also a bonus for value. The stated price is $3.62 per person, but the tour is structured as pay-what-you-want at the end. In plain terms: you’re not paying a huge fixed package fee. If the guide works for your group, you can reflect that in what you give at the end.
You can also read our reviews of more walking tours in Ghent


Price and value: $3.62 up front, pay-what-you-want at the end
This tour’s value is about two things: access and guidance. You’re getting an organized route through major sights, plus “why this place mattered” context, plus guidance on where to eat, drink, and roam next.
Here’s the practical way to think about the cost:
- $3.62 gets you the walking tour experience and the guide’s time.
- The pay-what-you-want ending is how the guide is rewarded. If you want more time with explanations, a story-led route earns a bigger tip.
- Some entrances are optional or not included at certain stops. So you control your total spend.
If you’re the type who likes to learn quickly and then wander on your own, this format is a good match. If you prefer quiet self-guided visits, you might feel a bit rushed—because the whole point is to cover a lot in two hours.
Getting Oriented: meeting near Hostel Uppelink and ending at the Belfry
The tour begins at Hostel Uppelink, Sint-Michielsplein 21, 9000 Gent. You’ll finish at the Belfry area (Belfort van Gent, Sint-Baafsplein, 9000 Gent). That “start near the skyline, end at the people’s tower” logic is smart: it keeps the walk connected to how Ghent’s center is laid out.
Timing is also realistic. The tour runs about 2 hours, and the stop durations are built for a steady pace—usually around 10 minutes per site, with the first stop getting a touch longer for the big picture.
You’ll also be dealing with the basics of a city center walk: cobblestones, uneven spots, and regular photo stops. The tour is listed as suitable for most people, and the format isn’t described as a tough hike. Still, if you have mobility limits, treat it as an “on-foot city walk” rather than a gentle stroll.
Stops 1–5: trading canals, a design-minded detour, and Gravensteen up close

Stop 1: St Michael’s Bridge (about 15 minutes)
You start at St Michael’s Bridge to get your bearings fast. The guide sets up Ghent’s medieval role as a trading hub and introduces the skyline idea—especially the three towers you can best see from here. It’s a good first move because it gives you a visual anchor before you start weaving through the streets.
If you’re the kind of traveler who likes to understand a city’s layout, this start helps. You’ll know what you’re looking at when towers appear in the background later.
You can also read our reviews of more historical tours in Ghent


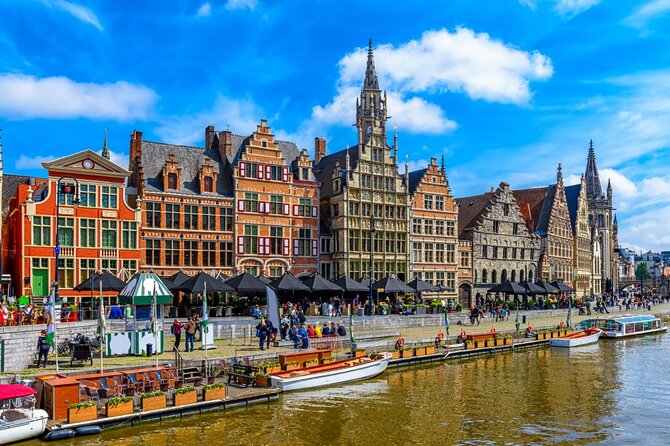
Stop 2: Graslei and Korenlei (about 10 minutes)
Next comes the postcard-y heart of the old center: Graslei and Korenlei. This is where the guide ties the buildings to the city’s port and trading activity. The key value here is the explanation. You’re not just seeing a pretty canal frontage—you’re learning what trade looked like in stone and brick.
Try to pause when your guide points out the details. This stop is short, but it’s one of the most “readable” sections of the route.
Stop 3: Design Museum Gent (about 10 minutes)
Then you get an unexpected angle: Design Museum Gent. The guide explains why a specific aspect of the museum symbolizes the stubborn, rebellious mindset associated with the people of Ghent. It’s a quick stop, but it adds personality to the tour.
Think of it as a cultural speed bump. It keeps Ghent from feeling like only cathedrals and castles.
Stop 4: Het Groot Vleeshuis (about 10 minutes)
Across the water viewpoint: Het Groot Vleeshuis, with a view of the medieval covered Great Butchers’ Hall. The guide shares some darker facts behind the building’s past. This is one of those stops that changes how you see the architecture—because you suddenly connect a stately facade to the realities of medieval life.
If you like history with edge, this is one to pay attention to.
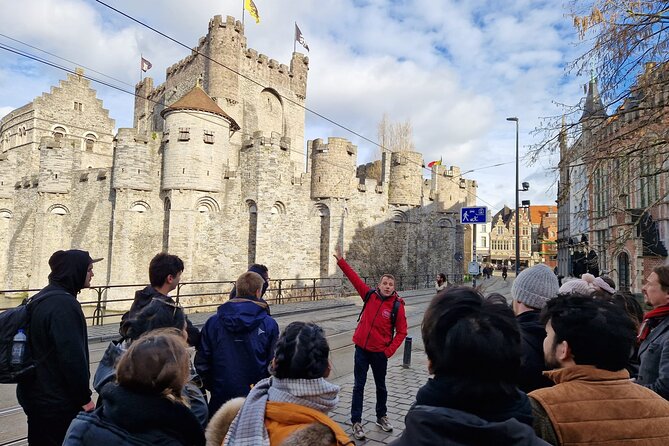
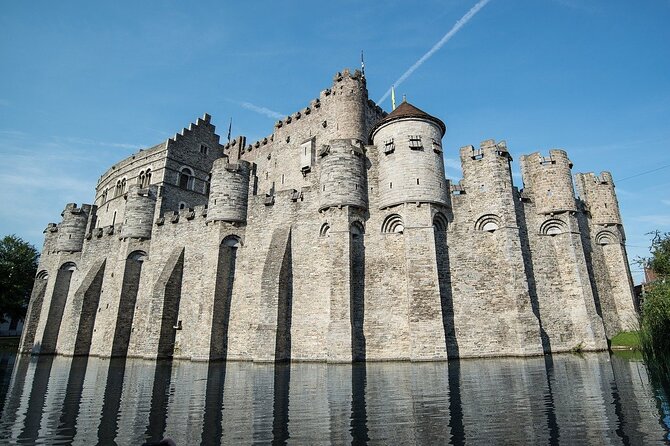
Stop 5: Gravensteen (about 10 minutes)
Now the center stage: Gravensteen—the medieval Castle of the Counts. What makes it different from many castles is that it sits right in the middle of the city and is described as very well preserved. Your guide explains the castle’s past, but the bigger benefit for you is walking through an active-feeling urban setting that still carries medieval weight.
Even if you skip an entrance, you’ll walk away with a clearer sense of power in Ghent: who held it, and how it was physically built into the town.
Stops 6–13: squares with nicknames, churches, and a Van Eyck payoff
Stop 6: St. Veerleplein (about 10 minutes)
This is a square with a reputation: St. Veerleplein, known as the square of death and the square of life. You won’t just memorize the nickname. Your guide explains why it earned both labels.
This is the kind of stop that makes street-level storytelling click. You start looking for meaning behind the city’s strange names.
Stop 7: Huis van Alijn (about 10 minutes)
Next is Huis van Alijn. The guide connects it to a practical and human side of history: it used to be a hospital, and it’s described as the only remaining god house. You’ll hear how it became a hospital, plus an unfortunate story tied to that change.
Even without going inside, you’ll understand why a building like this matters. It’s not just pretty stone; it’s part of how people survived.
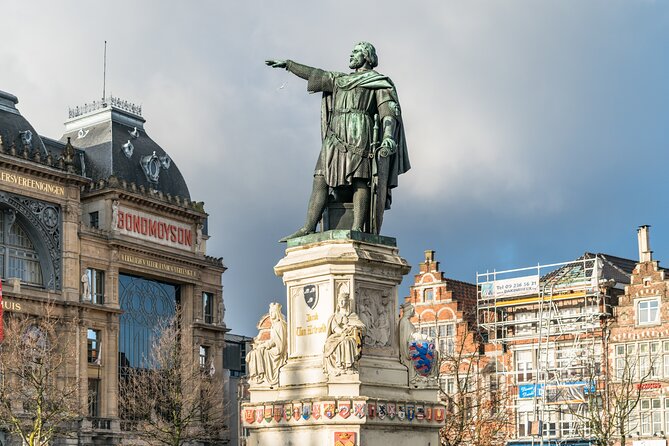
Stop 8: Vrijdagmarkt (about 10 minutes)
At Vrijdagmarkt, the guide brings you into the city’s public life. This square has played a prominent role in Ghent’s history, and there’s a statue in the middle that anchors the story.
If you’re wondering why Ghent squares look the way they do, this is a useful stop. Squares weren’t just for markets; they were stages for civic identity.
Stop 9: Werregarenstraat (about 10 minutes)
Now you hit a very modern urban issue: Werregarenstraat. The city designates an area for street artists so monumental buildings don’t get sprayed by graffiti. The guide walks you through the area, showing you how Ghent tries to balance expression with preservation.
This stop is short, but it helps you see Ghent as alive now, not just in a museum case.
Stop 10: Ghent Town Hall (Stadhuis) (about 10 minutes)
Your guide points out why the Ghent Town Hall looks a little confused. The explanation links it to the biggest conflict in Ghent’s history. Admission may not be part of what’s included for you here, but the exterior story still does a lot of work.
If you love when architecture reflects politics, don’t let yourself get distracted by the photo angle. Listen for the conflict explanation.
Stop 11: St. Bavo’s Cathedral (about 10 minutes)
Then comes the big cultural anchor: St. Bavo’s Cathedral. The guide highlights the cathedral’s history and the art treasures inside—especially the world-famous Ghent Altarpiece by the Van Eyck brothers.
Even if you don’t plan an in-depth art visit, this stop is worth it because it frames what you’ll want to see later in the cathedral.
Stop 12: Het Belfort van Gent (about 10 minutes)
Time for the people’s tower: Het Belfort van Gent. The belfry is described as reflecting stubbornness, power, and independence. It also used to function as a prison, and the façade ties into a bizarre legend the guide will share.
This is one of the stops where a good guide really matters. Legends are fun, but it’s also about understanding why a city chooses a symbol and keeps reusing it.
Stop 13: Esglesia de Sant Nicolau (about 10 minutes)
The walk ends with a calm, focused finale at Esglesia de Sant Nicolau. It’s an early 12th-century church looking out over Korenmarkt, dedicated to St Nicholas—protector of merchants and sailors. The façade connects to the legend of its patron saint, which is a satisfying way to tie the tour’s trading theme to faith.
If you’ve been listening all the way through, this last stop feels like the tour’s thread pulled tight.
How the guide makes the walk better than a highlight list
A walking tour lives or dies on the story thread. Here, the thread is clear: Ghent’s trade mindset, the civic push for independence, and the way religion and public institutions shaped day-to-day life.
What I’d do if I were in your shoes: bring a notebook-style mindset, even if it’s just your phone notes. When your guide talks about why a square has a nickname, or why a building looks the way it does, write down one detail you want to see again later. That small habit turns the tour into a personal city guide.
Also, don’t be shy about questions. In the feedback for this tour, the guides are repeatedly described as encouraging questions, with humor that keeps the group engaged. If something sounds confusing—like the Town Hall story—ask. Those explanations are the point.
Practical tips so you enjoy the 2 hours (instead of chasing them)
This is a short tour, so you’ll want to be comfortable from the first minute.
- Wear shoes you trust on cobblestones and uneven paving.
- Bring a water bottle if it’s warm. You’ll cover a lot of ground for two hours.
- If rain is in the forecast, keep your eye on the plan. The tour requires good weather, and if it’s canceled due to poor weather, you’ll be offered another date or a full refund.
- If you’re into photos, plan to stop when the guide points things out. Some views only make sense in context.
If you want to stretch the day after the tour, ask your guide for a short list of where to eat and drink. The tour format is designed to end with momentum, so you’re not stuck deciding everything from scratch.
Who should book Legends of Gent

This tour is a great fit if you:
- want a first-timer orientation to Ghent in about two hours
- enjoy walking with a local guide who connects landmarks to stories
- like art and architecture but also want context about trade, power, and daily life
- want a route that helps you choose what to see more deeply after
It’s also a good option if you’re comparing cities and need a strong payoff fast. One piece of feedback highlights choosing Ghent over Bruges specifically because this kind of guided overview gives you a strong sense of the city right away.
Should you book this tour?
I think you should book Legends of Gent if your goal is to understand Ghent quickly and then wander with better instincts. The price is low for a guided route, and the pay-what-you-want ending makes it feel fair. The itinerary hits major anchors—St. Bavo’s Cathedral, Gravensteen, the Belfry—while still spending time on the kind of details that make Ghent feel like a real place.
Skip it only if you hate walking, want an art museum day without city stories, or you prefer total silence. Otherwise, this is one of the simplest ways to get your bearings and start building a personal Ghent plan.
FAQ
How long is Legends of Gent?
It lasts about 2 hours.
Is the tour offered in English?
Yes, it is offered in English.
Where do I meet and where does the tour end?
You start at Hostel Uppelink on Sint-Michielsplein 21, and the tour ends at Belfort van Gent on Sint-Baafsplein.
What is the group size limit?
The tour has a maximum of 35 travelers.
Is the ticket mobile?
Yes, you receive a mobile ticket.
Does the tour use a pay-what-you-want format at the end?
Yes. You pay what you think the tour is worth at the end of the experience.
Are admission tickets included for every stop?
Some stops list admission ticket not included (like Design Museum Gent, Gravensteen, Ghent Town Hall, and the Belfry), while others are free.
Does the tour run in bad weather?
It requires good weather. If it’s canceled due to poor weather, you’ll be offered a different date or a full refund.
What is the cancellation policy for a full refund?
You can cancel for a full refund up to 24 hours in advance. If you cancel less than 24 hours before the start time, the amount paid is not refunded.