REVIEW · BRUGES
Bruges: Silver Ring-Making Workshop
Book on GetYourGuide →Operated by The Silver Hand · Bookable on GetYourGuide
Your ring starts as a flat strip. In Bruges, you turn sterling silver into a wearable keepsake with your own hands, step by step. I love how hands-on it is, not a show-and-tell. I also love the custom stamp you add inside the band, plus the finish you choose for the final look.
One possible drawback: you’ll be using real tools, so you need to feel comfortable standing, working carefully, and wearing the right footwear.
Meeting at Bennett & Mason puts you right in the center of Bruges, inside a proper retail workshop space with clear instructions and a small-group feel.
In This Review
- Key things I’d highlight before you go
- Why making a ring in Bruges feels different than buying one
- Bennett & Mason: the meeting point that keeps things simple
- The full 150-minute ring-making flow (and what each step is teaching you)
- Choosing your ring’s shape and design direction
- Measuring and cutting to size (yes, you do the cutting)
- Stamping a custom message inside the ring
- Hammering and shaping: from flat metal to a rough ring
- Soldering: the moment it becomes one piece
- Fit check, then refining into a perfect round
- Texture and markings: make it feel uniquely yours
- Finishing: polished, satin, or rough forged
- The custom message inside: small detail, big meaning
- Finishes explained in plain terms (so you can choose confidently)
- Polished: clean shine and maximum reflection
- Satin: a soft sheen that feels understated
- Rough forged: rustic texture with character
- Group size, pace, and what “beginner-friendly” really means here
- What’s included (and why that matters for value)
- Who this Bruges silver ring workshop suits best
- Should you book it?
- FAQ
- FAQ
- How long is the Bruges silver ring workshop?
- Do I need any prior jewelry-making experience?
- What material will I use for my ring?
- Can I add a personal message inside the ring?
- What ring finishes can I choose from?
- Is this a small-group activity?
- What should I wear or bring to the workshop?
- Is the workshop suitable for children or wheelchair users?
Key things I’d highlight before you go
- Small group, personal attention: limited to 4 participants, with English instruction.
- You control the ring’s personality: choose the shape/style and add a stamped message inside.
- Real technique, not a demo: hammering, filing, cutting to size, and soldering are part of the process.
- Your finish is your style: polished, satin, or rough forged.
- A practical, comfortable setup: aprons provided, plus tea/coffee, soft drinks, and small snacks.
- Plan for hands-on work: saws, hammers, files, and close-up detail work are all involved.
Why making a ring in Bruges feels different than buying one
Bruges has plenty of souvenir shopping. This workshop is a different kind of memory. You’re not just leaving with a pretty object. You’re leaving with something that has your fingerprint on the shape, your choice in the details, and your words sealed into the inside of the band.
What makes it work is the mix of guided technique and creative choice. You get enough structure to know what you’re doing (even with zero prior experience), and enough freedom to make it yours—whether that means a cleaner look with a polished finish or a more rustic feel with rough forged texture.
At $206 per person for 150 minutes, you’re also paying for the “how,” not just the metal. The workshop includes materials, instruction, and the equipment time. That matters because a ring like this is mainly labor and skill.
You can also read our reviews of more tours and experiences in Bruges


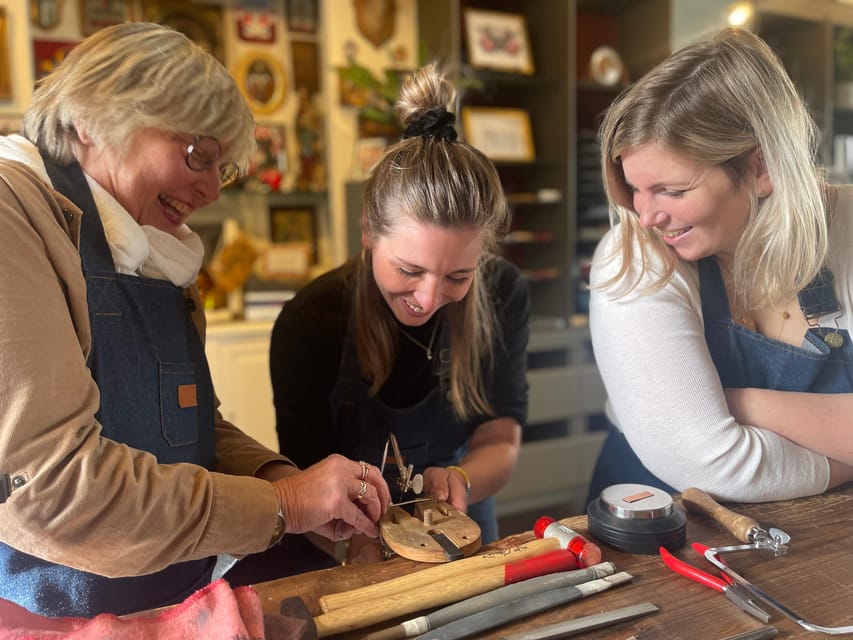
Bennett & Mason: the meeting point that keeps things simple
You meet at the store and workshop Bennett & Mason in the center of Bruges. Look for the large double red framed windows with the shop logo. If the door is closed, you ring the bell.
The practical win here: you start inside a dedicated work space rather than off-site studios. That usually means everything you need is on hand, and the day stays focused on making your ring rather than figuring out logistics.
You’ll also get an apron for the session, plus a secure place to store luggage. That’s a small detail, but it makes the whole experience easier—especially if you’re in Bruges for a short stay and you don’t want to lug bags around while you’re working.
The full 150-minute ring-making flow (and what each step is teaching you)
The workshop is designed to carry you through the full arc of ring-making: choosing, cutting, shaping, soldering, fitting, refining, and finishing. You’re hands-on throughout, with safety guidance when using tools.
Choosing your ring’s shape and design direction
You begin by picking the ring shape and style. The point isn’t to decide everything perfectly right away. It’s to choose a direction you’ll enjoy wearing. Even if your first idea isn’t your final idea, the time is planned so you still end up with a completed, wearable ring.
Think about what you’ll want day-to-day. A thicker look can feel more solid. A slimmer shape can feel more delicate. This is where you can also think about textures or markings you might want later.
Measuring and cutting to size (yes, you do the cutting)
Next comes finger measuring and silver sizing. You’ll have your silver measured, then the band is cut to size with a handsaw. This is one of those moments that makes the workshop feel real. You’re not approximating; you’re participating in the core construction step.
This is also why comfortable clothes matter. You’ll lean in and work carefully. You’ll want stable footing.


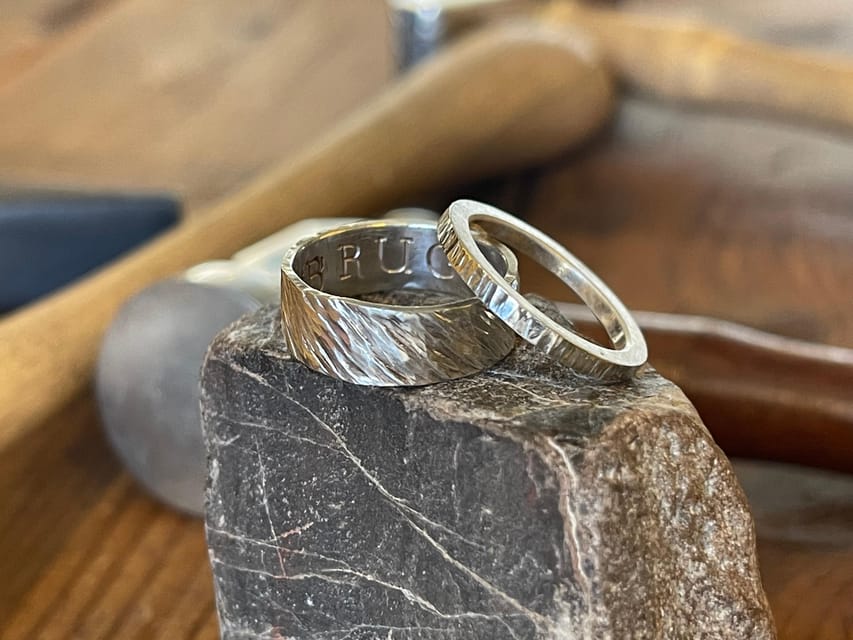
Stamping a custom message inside the ring
Now for one of the most memorable parts: stamping a message inside the band. You can choose from hand stamps for names, dates, or even the name of your favorite beer. The message becomes the ring’s secret detail—something you see only when you turn it.
This step is also a good test of patience in a good way. You’ll get guidance on how to place the stamp and how to apply pressure. It’s doable even for beginners, as long as you listen to the instructor’s safety and positioning tips.
Hammering and shaping: from flat metal to a rough ring
Then you use mallets and a triblet to hammer the silver into a rough ring shape. It starts looking like a ring surprisingly quickly, but it still won’t be perfect yet. That’s intentional: early stage shaping teaches you how metal moves under force and how the roundness evolves.
Soldering: the moment it becomes one piece
You’ll also see a demonstration of the soldering process—heating and joining the silver to complete the ring’s shape. Then the focus returns to fit and refinement.
This is the “craft” part that makes the final result feel legitimate. It’s not just bending a strip and hoping. Joining is what locks the ring into a stable form.
Fit check, then refining into a perfect round
A fit check follows so the ring sits comfortably. Then you refine the shape to make it perfectly round before you move to the outer details and finishing.
If your ring feels a little “off” during shaping, don’t panic. The workshop flow is built for correction—small adjustments happen before the finishing step, so you’re not stuck with a mistake.
Texture and markings: make it feel uniquely yours
You can experiment with textures or unique markings. This is where personal style takes over. If you want a smoother, minimal design, you can keep things subtle. If you like contrast, you can push the texture choice.
Finishing: polished, satin, or rough forged
Finally, you choose your preferred finish:
- Polished for a bright sparkle
- Satin for a softer, more muted sheen
- Rough forged for a rustic look
Your finish choice affects how the ring reflects light and how it visually “ages” over time. It also changes the feel of the surface, so it’s worth choosing with how you want to wear it in real life.
The custom message inside: small detail, big meaning
A lot of souvenirs are visible immediately. Your stamped message is different. It’s personal, private, and wearable—especially if you choose something that has context for you.
Examples that fit the vibe of this workshop include:
- a name
- a date
- a favorite beer name
I like that it doesn’t need to be overly sentimental to work. Even a short phrase can turn the ring into a daily reminder. And because it’s inside the band, it stays protected from wear compared to artwork on the outside.
Finishes explained in plain terms (so you can choose confidently)
Here’s how to think about the three finishes, without overcomplicating it.
Polished: clean shine and maximum reflection
Polished silver gives the brightest look. If you want something that looks “just finished,” this is the option. It also shows off any smooth shaping you did, because the surface catches light evenly.
Satin: a soft sheen that feels understated
Satin is a middle ground. It’s still attractive, but less mirror-like. If you’re thinking about everyday wear, satin often feels more forgiving visually because it doesn’t scream for attention every time you move.
Rough forged: rustic texture with character
Rough forged is for a more handmade, earthy vibe. It’s also a great choice if you want your ring to look like it came from a real workshop, because that’s exactly what it feels like.
If you’re torn, a quick rule is: polished for classic sparkle, satin for quiet elegance, rough forged for lived-in character.
Group size, pace, and what “beginner-friendly” really means here
This is a small group workshop limited to 4 participants. That’s a big deal because hand tool work needs attention. You don’t get shoved into a line with minimal help. The session stays practical and structured, with time for guidance as you move through each station.
The instruction is in English. You don’t need prior jewelry tools or silverworking experience. You do need to pay attention and follow safety instructions, because you’ll use saws, hammers, files, and other specialist tools.
A couple of small, helpful notes:
- Bring reading glasses if you need them for close-up work.
- Wear comfortable shoes and comfortable clothes.
- Skip high heels and open-toe footwear.
- Listen to the guidance at each tool moment—your safety matters more than speed.
And yes, the mood is relaxed in the best way. You’re there to make something, not to be rushed.
What’s included (and why that matters for value)
This workshop isn’t just instruction. It includes a lot of what you’d otherwise pay for or worry about.
Included:
- All materials for your ring, including recycled 925 sterling silver
- Tea & coffee, soft drinks & water
- Small snacks (biscuits/chocolates)
- A secure luggage storage place
- Aprons
Not included:
- Transportation to/from the workshop
- Food and drinks beyond what’s listed above
Value-wise, $206 is easier to justify when you see what’s covered. You’re not paying extra for metal, tools time, or the basic refreshment setup. You’re paying for the entire guided process, the equipment use, and the finished outcome being something you helped create from start to finish.
If you’re the type who enjoys doing, not just watching, this makes sense. If you only want a light craft without tools, it may feel too hands-on.
Who this Bruges silver ring workshop suits best
This is a strong match if you’re:
- celebrating something (especially as a couple)
- into hands-on crafts
- the sort of person who likes wearing a story
- visiting Bruges and want an activity that feels tied to place, not generic sightseeing
It’s also ideal if you want a polished result without needing experience. The session is set up so you can learn the steps while doing them.
A clear mismatch:
- Children under 9 years old
- Wheelchair users (not suitable)
Also, if you hate working with tools or don’t want to stand for 150 minutes, skip it. You’ll likely feel more stressed than inspired.
Should you book it?
If you want a Bruges experience with real payoff—something you’ll keep and wear—book the workshop. The best part isn’t the finished ring alone. It’s how the ring is built: cutting, shaping, soldering, stamping, and then finishing in the exact style you chose.
I’d say yes if you’re comfortable being hands-on and you want a personal keepsake that’s not mass-produced. I’d hesitate only if you’re seeking a low-effort activity or you’re not comfortable wearing the right footwear for a tool-based workshop.
FAQ
FAQ
How long is the Bruges silver ring workshop?
The workshop lasts 150 minutes.
Do I need any prior jewelry-making experience?
No prior experience is needed. The workshop is designed for beginners.
What material will I use for my ring?
You use recycled 925 sterling silver.
Can I add a personal message inside the ring?
Yes. You can stamp a custom message inside the band using hand stamps.
What ring finishes can I choose from?
You can choose polished, satin, or rough forged.
Is this a small-group activity?
Yes. It’s limited to 4 participants.
What should I wear or bring to the workshop?
Wear comfortable clothes and comfortable shoes. Avoid high heels or open-toe shoes. You may also want reading glasses if you need them for close-up detail work.
Is the workshop suitable for children or wheelchair users?
It is not suitable for children under 9 years old and it is not suitable for wheelchair users.